Simulation Evaluation Platform User Guide
Run a model on your own GPU server, connect it to the X2Real cloud platform through Policy Space, and submit a simulation evaluation.
Abstract
X2Real combines simulation environments calibrated against physical robots with 44 tasks spanning 10 capability dimensions. Training and evaluation environments are kept separate. It is intended to provide extensible infrastructure for simulation-based evaluation and synthetic data generation, enabling a credible, comprehensive and fair assessment of task execution and adaptation to new environments.
This guide describes how to run a model on a developer-provided GPU server and connect it to the X2Real cloud platform through Policy Space. The developer operates the model inference service; the platform performs simulation, scoring and trajectory recording for subsequent replay. The procedure applies to different models. A short π0.5 example is given in the final section. Before submission, developers may optionally test the integration locally using the ManaEnv simulation client and in-distribution (ID) assets.
Workflow: Prepare the inference environment → Adapt the model to Policy Space → Start the Model Server → Register the service and submit a cloud evaluation.
Resources
Technical Report: https://arxiv.org/pdf/2609.27449
Policy Space: protocol, service runtime and model adapters
X2Real cloud platform and task library
Prepare the inference environment
Optional fine-tuning: Select data from the X2Real dataset that matches the robot embodiment and action space. After fine-tuning, deploy the resulting checkpoint.
- A developer-provided GPU server. The driver, GPU memory and dependencies must meet the model's inference requirements. The running service must be reachable from the X2Real cloud platform. For cloud evaluation alone, the model server does not require a simulation installation.
- The model inference files. These comprise the checkpoint, inference code, loading configuration, and any preprocessing, postprocessing and normalisation parameters required by the model.
- The robot embodiment and action space. Establish which robot and control mode the model supports, such as joint control or end-effector pose control. The Policy Space adapter must then convert observations and actions to the conventions required by the X2Real platform.
Adapt the model to Policy Space
Policy Space provides a common WebSocket protocol and service runtime. A custom model is integrated primarily through model.py and deploy.yaml.
Policy Space repository and existing adapters
- Convert the inputs (
model.py). Map platform observations to the model inputs. Check camera views, RGB and image layout, state fields and their order, and task instructions. Apply the required resizing and normalisation once. The selectedobservation_schemadefines the available fields. - Convert the outputs (
model.py). Express model predictions in the form required byaction_schema. Check dimensions, units, coordinate frames, absolute or relative interpretation, gripper range and temporal order. Apply the required denormalisation, including the gripper opening range. If the model pads its internal representation to a fixed dimension, remove the padding before returning the contract-defined action dimensions. All action values must be finite; NaN and positive or negative infinity are invalid. A common output is an actions array of shape[T, D], where T is the number of action steps and D is the dimension of each step. The selected contract determines the actual return keys and structure. - Declare the interface (
deploy.yaml). Setobservation_schema,action_schemaandembodiment_constraintsundermetadata.supported_schema_pairs. Declare the action type, dimensions, horizon and gripper conventions required by the adapter. These declarations must agree with the actual input and output conversion. - Manage episode state (
model.py). Useinitialize_episodeto initialise an episode,ingest_observationto receive observations,infer_actionsto return inferred actions, andfinalize_episodeto clear episode state. Histories and caches must remain isolated between episodes.
Camera counts and action dimensions may differ between models and embodiments. A model can be evaluated only if the platform supports its contract combination. Support for a new contract or embodiment must be confirmed with the platform; declaring a new name alone is insufficient.
Observation, action and embodiment contracts
Start the Model Server
On the model server, activate the Python environment containing the model's inference dependencies, then install Policy Space. The following commands use uv. If another environment manager is used, installation and execution must use the same Python interpreter.
git clone https://github.com/X-Square-Robot/policy-space.git
cd policy-space
uv pip install --python "$(command -v python)" -e .
export PYTHONPATH="$PWD/src:$PWD/packages/protocol/src:$PWD"

# Set checkpoint paths and other options as specified in the adapter README.
# Replace the deployment path below.
POLICY_DEPLOY=policies/your_family/your_policy/deploy.yaml
python -m policy_space.cli check "$POLICY_DEPLOY"
python -m policy_space.cli serve "$POLICY_DEPLOY" --host 0.0.0.0 --port 8001
Run serve after check returns status: passed. The check command loads the actual model and performs inference on synthetic observations, which may use GPU resources. A successful check establishes interface conformance; it does not establish task performance. Keep the service running with tmux or a process manager until evaluation has finished.
Select the session mode through server.session_mode in deploy.yaml. Use exclusive when the model retains episode-specific history or caches. Use multiplexed_serial only after verifying that model state is safely isolated. The deployment guide gives the conditions for each mode.
When registering the model, provide a complete Policy Space service endpoint reachable from the cloud platform, including its scheme, host, port and any path. Configure port forwarding, domain names and access controls for the server's network environment. The bind address 0.0.0.0 is not a client endpoint; use the server's reachable address.
For loading failures, check the weights, configuration and dependencies first. For format errors, check the input/output conversion and contracts. If local checks pass but the cloud platform cannot connect, check the address, port and proxy configuration. If the service runs but robot motion is incorrect, examine units, coordinate frames, gripper scaling and action frequency.
Register the service and submit a cloud evaluation
The screenshots show the English interface. Control names in this guide follow the labels shown. The interface may change; the underlying workflow remains the same.
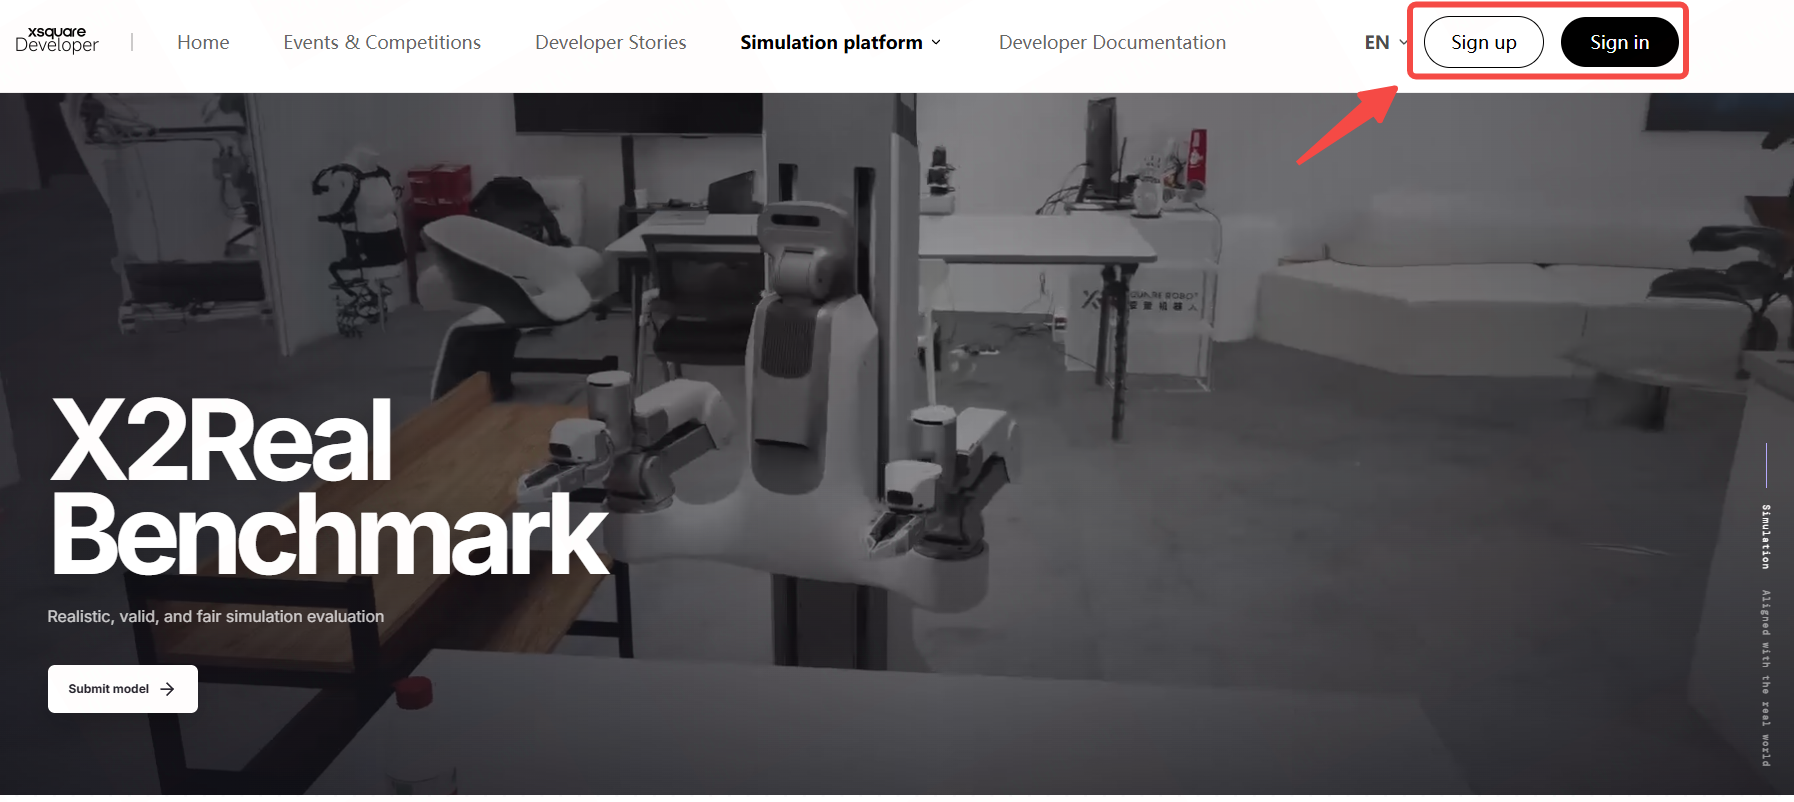
First, register or sign in to the X-Square developer platform. For a new account, verify an email address or phone number, then complete the nickname, identity type and organisation fields. For an existing account, sign in with your password: enter the account email address or phone number and password, and review and accept the displayed agreements before signing in.
Open My models
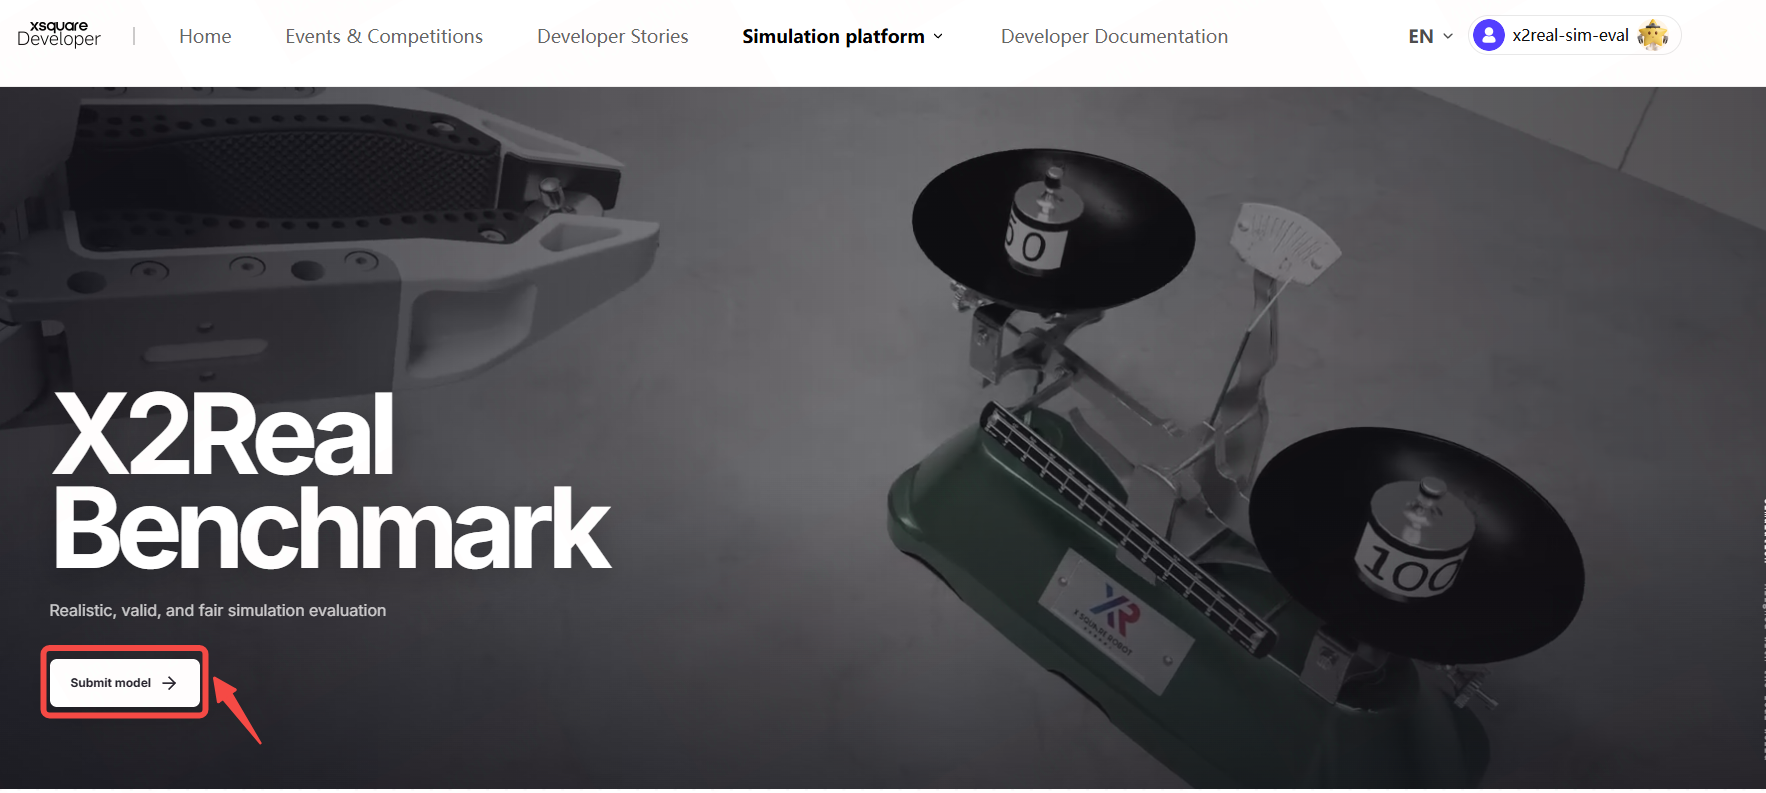
After signing in, open the simulation platform and select Submit model.
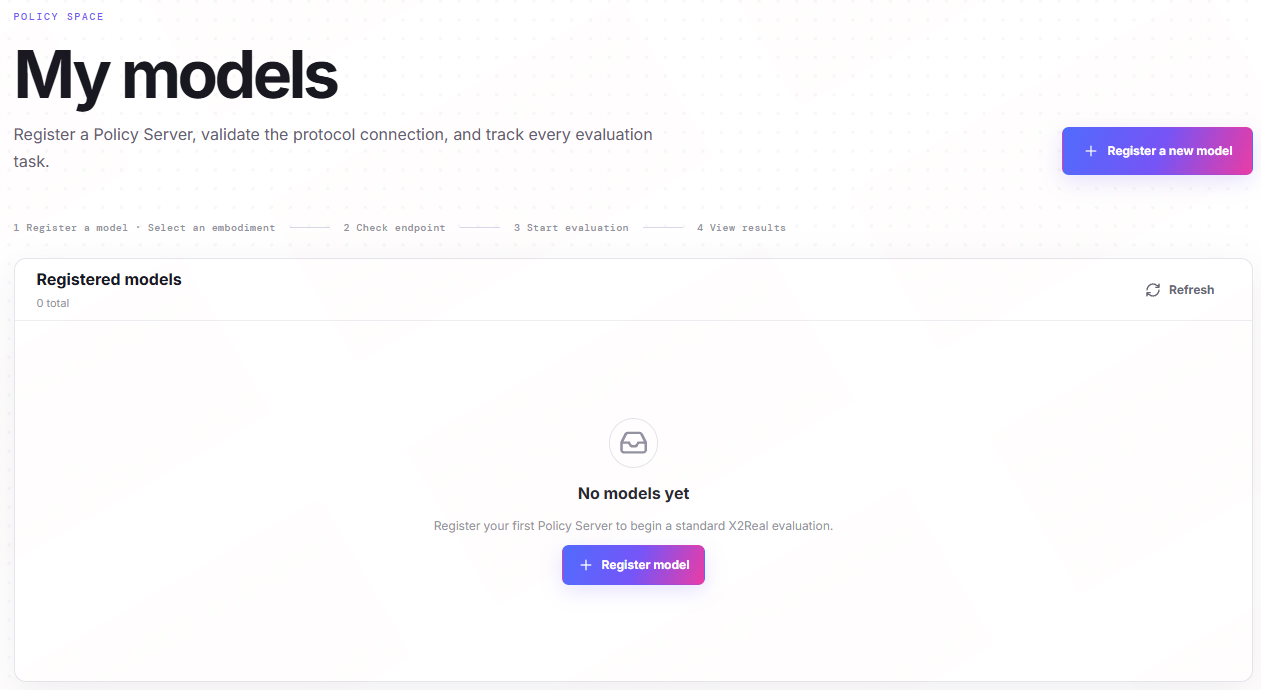
This opens My models. An empty list with “No models yet” is expected for a new account.
Register the model service endpoint
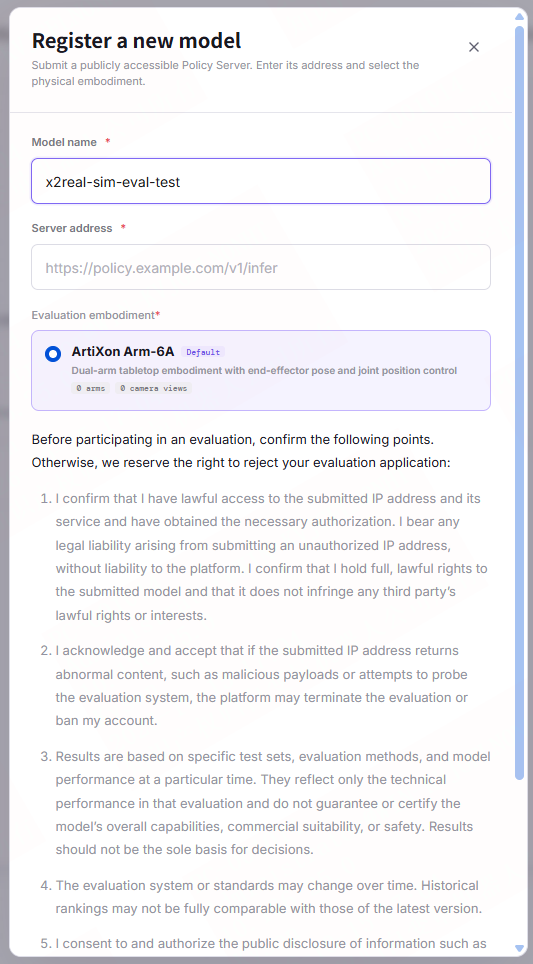
Select Register a new model and complete the following fields.
- Model name. Enter a recognisable name containing at least two characters.
- Server address. Enter the complete Model Server endpoint, preserving its scheme, port and any path. The platform form illustrated here uses
http://orhttps://; for example,http://model.example.com:8001. Replace this placeholder with your reachable service address. Policy Space itself uses WebSocket; follow the endpoint format required by the platform form and confirm connectivity with the interface check below. - Evaluation embodiment. Select the robot supported by the Model Server. The embodiment and action configuration declared by the service must also match.
Read the evaluation acknowledgements, including permissions to use the model and service and the publication of results. Confirm the applicable items, then select Register model. After registration, proceed to the interface check.
Check the interface
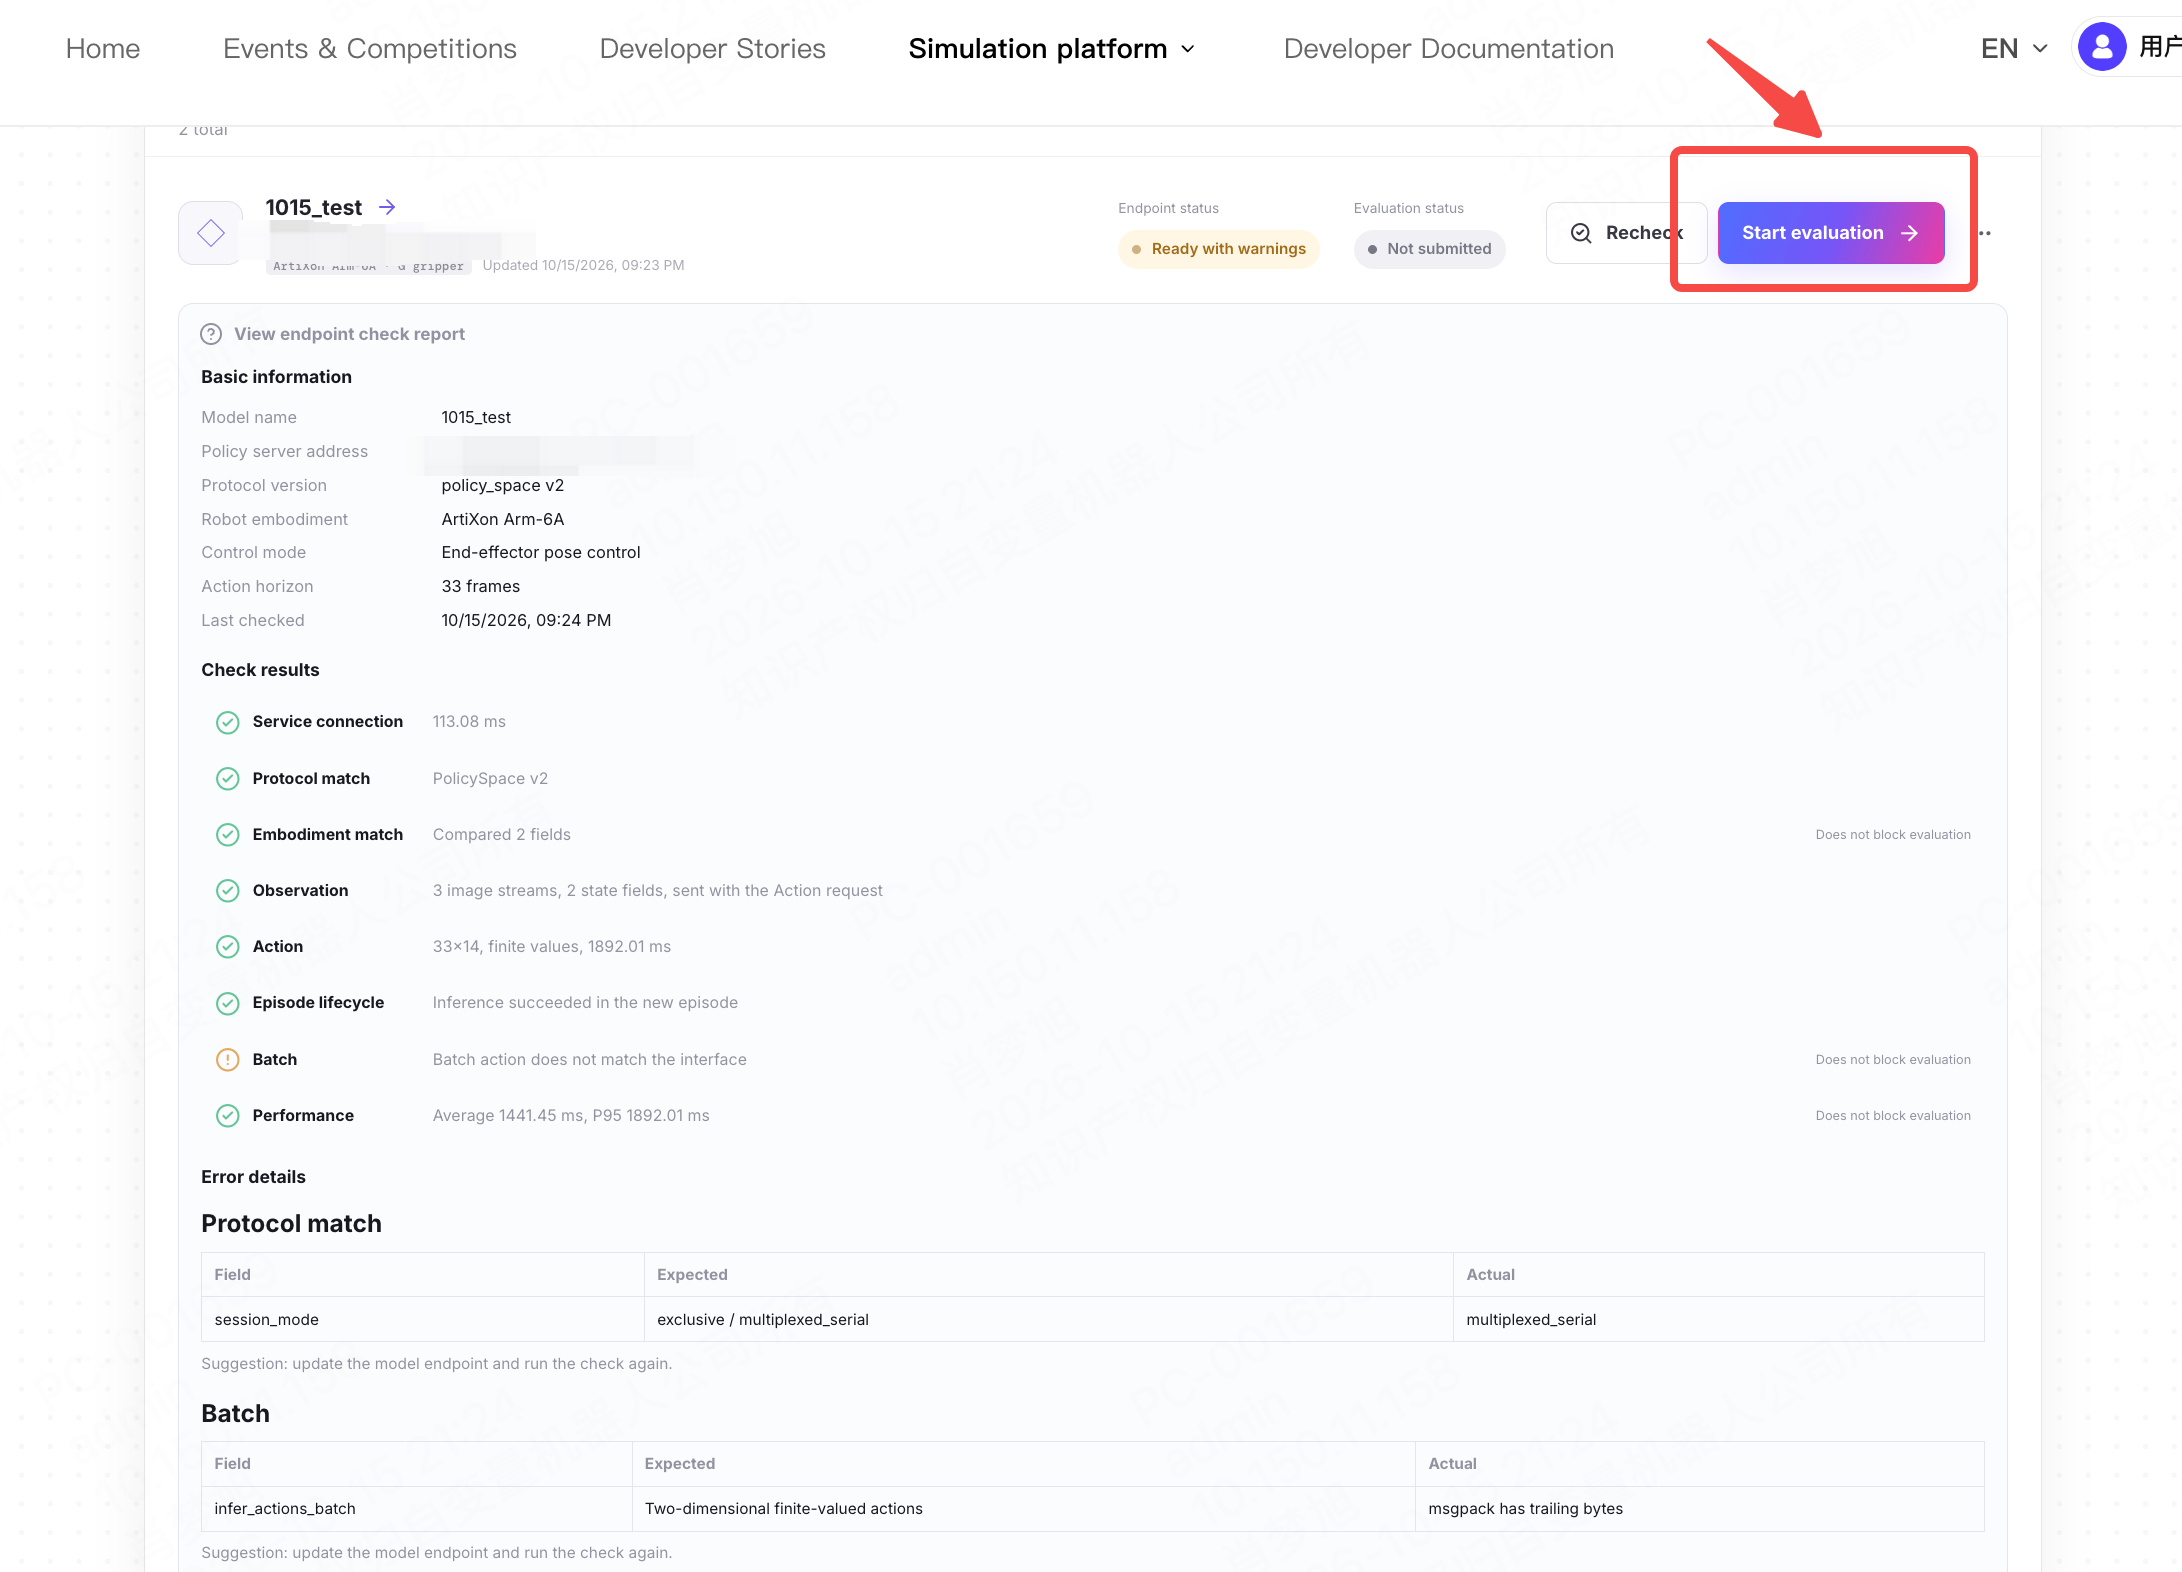
Select Check endpoint, or Recheck if a previous check exists. When the check finishes, expand View endpoint check report. Review the connection, protocol, embodiment, Observation and Action results.
- Ready for evaluation. Proceed to Start evaluation.
- Ready with warnings. Read the warnings. Items explicitly marked as “Does not block evaluation” allow evaluation to proceed.
- Failed or timed out. Inspect the failed items and service logs, correct the cause, then repeat the check. Avoid repeated clicks while a check is pending.
The interface check sends protocol and input/output probes to the service. Whether these probes invoke actual model inference depends on the service implementation. Passing the check establishes that the interface is usable.
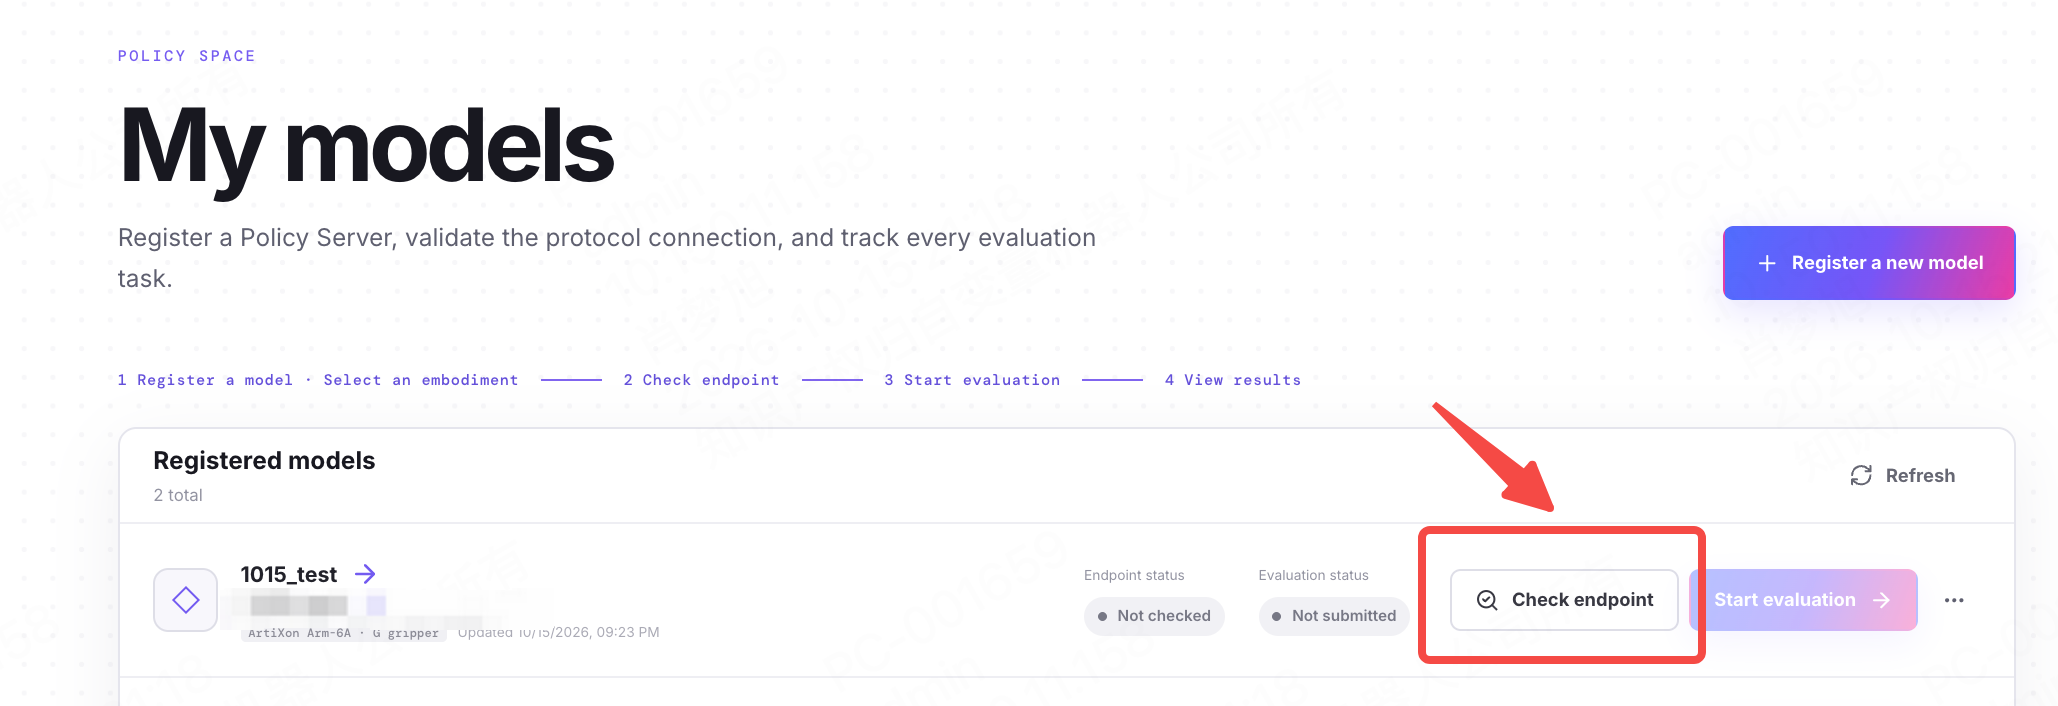
Once the interface is accepted, select Start evaluation.
Select the evaluation scope
Select Start evaluation to the right of the model. In the task-selection window, check the evaluation type and scope.
- X2Real. Select the required task categories and either in-distribution (ID), out-of-distribution (OOD), or both. ID assesses performance within the training data distribution; OOD assesses generalisation under distribution shifts. The platform defines the specific scenarios in each split.
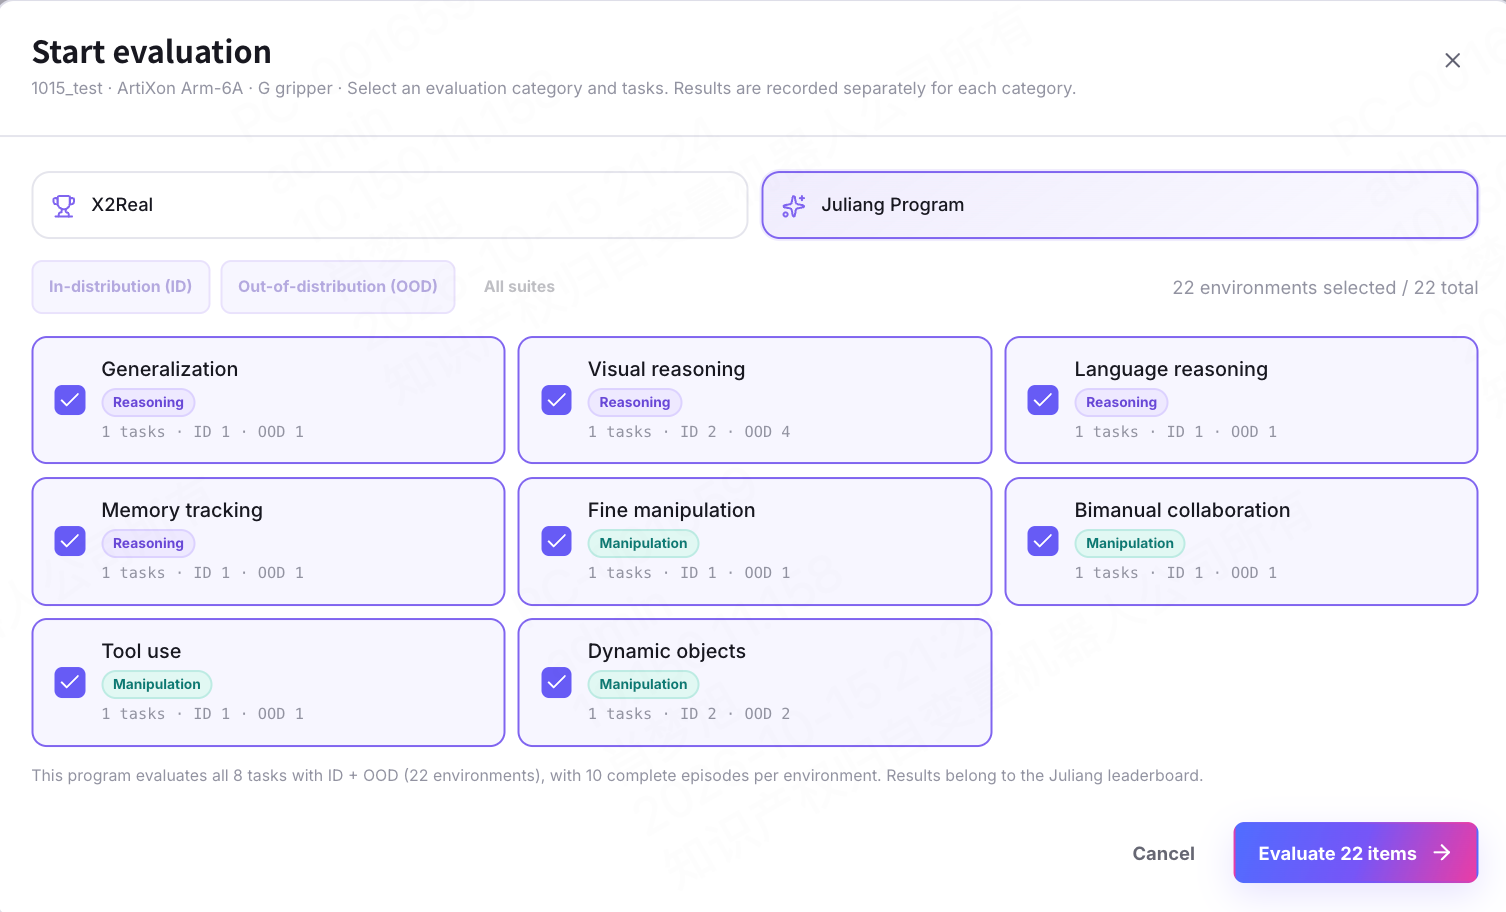
- Juliang Program. This uses a prescribed task set and ID/OOD scope. Check the task count shown in the current submission window.
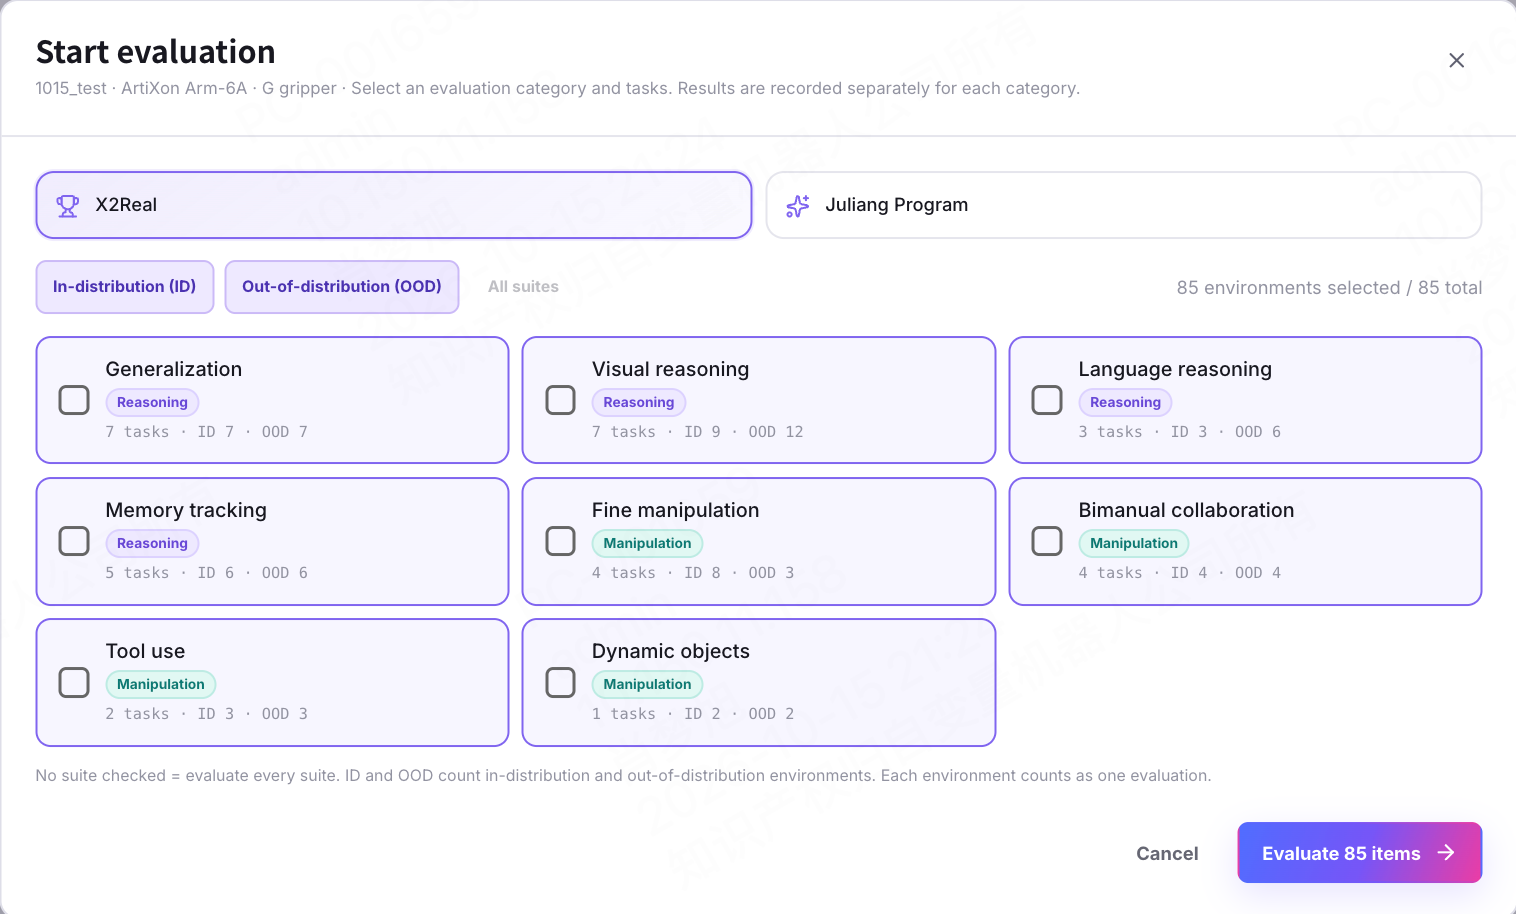
Example of a small initial evaluation: Select X2Real → select Dynamic objects → retain In-distribution (ID) and deselect Out-of-distribution (OOD) → check the count on Evaluate N items at the lower right. The scope listed in the submission window is authoritative. Task descriptions are available in the platform task library.
Before submission: Leaving all suites unselected submits all suites, rather than zero items. Explicitly select the required categories and distribution splits, then verify the item count. This count is not the number of trajectories: tasks are expanded into environment configurations and repeated episodes. The run record gives the actual total.
Submit and monitor progress
A complete Juliang Program evaluation currently takes approximately five hours. Jobs may first enter a queue when demand is high. The stated queue capacity is 100 users; actual waiting time depends on resource availability.
- One model per account at a time. If an account already has a queued or running evaluation, submission of another model is rejected. This limits resource use by any one account.
- Queue capacity available. The job is queued and its position is displayed, for example: “Queue position 85/100; estimated wait: X hours.”
- Queue capacity exceeded. Submission is rejected with a message asking the user to try again later.
Keep the Model Server running while the job is queued. When resources become available, the job moves from Queued to Preparing Environment and then Running.
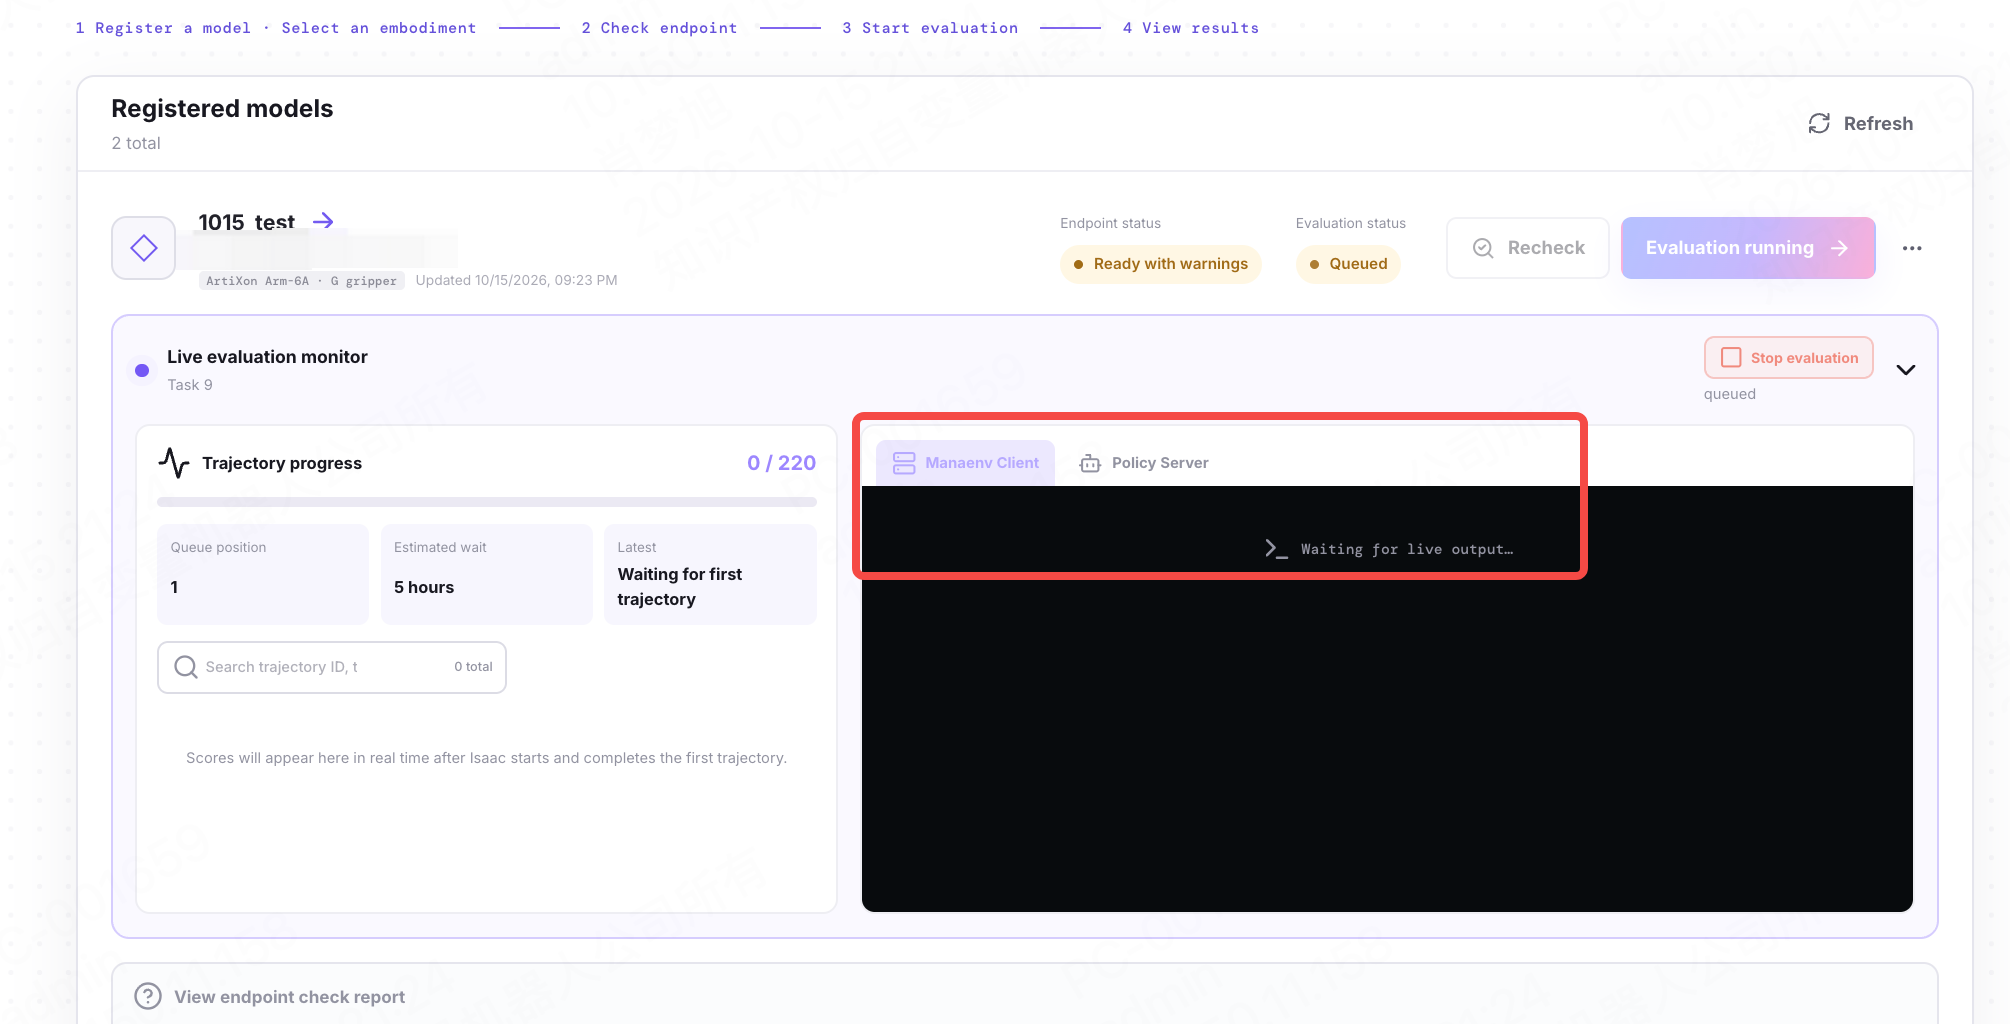
After confirming the scope, select Evaluate N items. While Submitting is displayed, wait for acceptance; do not repeatedly click the button or register the model again. Return to My models and expand Live evaluation monitor. Check the following items.
- Job status. Confirm that the job was accepted and distinguish Queued, Preparing Environment, Running, Completed and Failed.
- Trajectory progress. Compare the completed and total counts. “Waiting for the first trajectory” and an empty mean score are expected while queued. Failed trajectories also increase the completed count.
- Logs. Manaenv Client shows evaluator-side information; Policy Server shows model-service information. Start with the latest status and error messages when investigating a problem.
View trajectories and replays
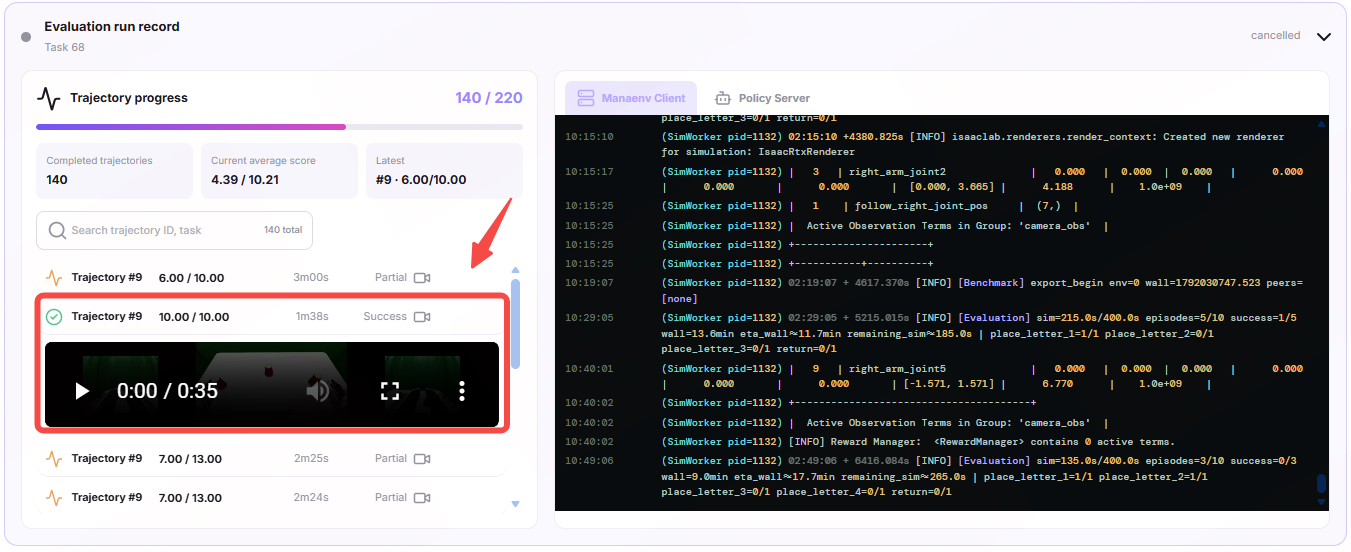
- Return to My models and select the model name to open its details.
- If an evaluation-type selector is available, select the type used for the run: X2Real or Juliang Program.
- Locate the run by time in the evaluation-session history. Select a trajectory to view its replay.
Stop, retry or modify a model
- Stop. Select Stop evaluation at the upper right of the monitor. Confirmation sends a stop request. Wait for the job status to change before taking further action.
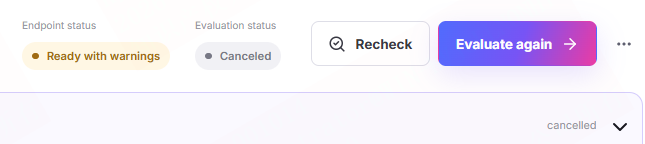
- Retry. After correcting the failure, select Evaluate again, review the scope and submit again. A retry starts a complete new evaluation; it does not resume from the interruption point.
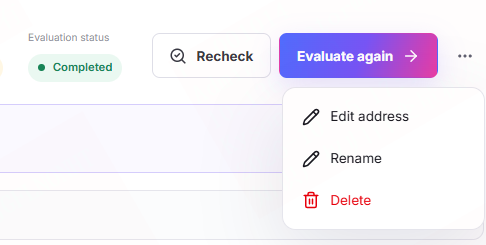
- Modify. The “…” menu on the model card provides options to change the endpoint, rename the model or delete it. Repeat the interface check after changing the endpoint. Endpoint changes and deletion are generally unavailable during a run. Deletion should not be used to stop an evaluation.
Common issues
- Start evaluation is unavailable. Confirm that the interface check has finished and permits evaluation. Check whether another job is already running.
- Resources are full or a network error occurs. Return to My models and check whether the job was accepted before retrying. Avoid repeated submissions.
- The interface check times out. If the service logs show no request, check the address, port, forwarding and firewall. If a request was received, examine loading and inference errors and their execution time. For dimension or contract mismatches, return to “Adapt the model to Policy Space”.
- The interface passes, but evaluation fails. Inspect the latest run status and logs, and report the issue to the platform team.
- The model details show no evaluation record. Check whether the selected evaluation type is X2Real or Juliang Program, and confirm that the run has finished. Running or failed jobs may not produce complete result records.
When reporting a problem, include the time, evaluation Job ID, job status, and relevant logs or screenshots. Redact passwords, service credentials and addresses that should not be disclosed.
Optional: run a local in-distribution test
This section is optional. Installation of the ManaEnv simulation client requires a GPU environment that satisfies the NVIDIA Isaac requirements. A separate environment from model inference is recommended. Once installed, the client requests actions from the Model Server endpoint and performs the evaluation. ManaEnv can also be used for synthetic data generation.
Open-source ManaEnv client and installation instructions
X2Real in-distribution assets: download and extraction
- Install the runtime according to the README. Download and extract the assets using the scripts in the assets repository. Set
MANAENV_ASSET_ROOTto the extracted asset root. - Keep the Model Server running and configure its endpoint so that it is reachable from the simulation client.
- Select the same embodiment, observation and action configuration as the model service. Check the execution horizon and action frequency. The open-source example
x2real_ps@v1.0.0.yamldefaults toabsolute_eeend-effector control; a joint-control model requires the corresponding joint configuration. - Use
x2real_eval.pywith--listto select an in-distribution environment, and use--policy-configto specify the matching policy YAML. Begin with--num-episodes 1and--num-parallel-envs 1before increasing the scope. The public release provides local ID testing; official results are determined by cloud evaluation.
Local testing is intended to expose behavioural errors such as incorrect camera order, joint and end-effector control mismatches, gripper scaling errors and inconsistent action frequency. Interface-format checks alone cannot establish correct behaviour.
Example: evaluate π0.5 with joint control
This example uses absolute joint control for the dual-arm ArtiXon Arm-6A. Deploy either a compatible π0.5 checkpoint of your own or one fine-tuned on data/x2real-desktop-joint-lerobot-v2 from the X2Real Dataset.
The existing π0.5 Joint adapter implements the following conversions in model.py and declares the corresponding contracts in deploy.yaml.
- Inputs. Three RGB views are used: front, left wrist and right wrist. The seven-dimensional
follow1_posandfollow2_posvectors are concatenated in left–right order to form a 14-dimensional state. The task instruction is passed as the OpenPI prompt. Images are mapped toobservation/image,observation/left_wrist_imageandobservation/right_wrist_image. - Outputs. The adapter returns float32 absolute joint actions of shape
[32, 14]. Each row contains six left-arm joints and the left gripper, followed by six right-arm joints and the right gripper. The gripper range is 0–1. Any internal padding to 32 dimensions must be removed before returning the actions. - Contracts. The schema pair is
bimanual_rgb_joint@1→bimanual_joint_position@1, with embodimentex001_6r@1. The 14-dimensional action space and 32-step horizon are requirements of this adapter, rather than universal requirements for all models.
Prepare the inference environment according to OpenPI and the checkpoint provider's instructions. Then run the following commands from the Policy Space repository. The example assumes that OpenPI already has a working .venv and that uv is installed. Replace the paths and configuration name with those for the checkpoint. OPENPI_TRAIN_CONFIG identifies the configuration used to load the model and its transforms; it does not start training.
export OPENPI_ROOT=/absolute/path/to/openpi
export OPENPI_CHECKPOINT_PATH=/absolute/path/to/checkpoint
export OPENPI_TRAIN_CONFIG=your_registered_config
export OPENPI_DEVICE=cuda:0
export CUDA_VISIBLE_DEVICES=0
uv pip install --python "$OPENPI_ROOT/.venv/bin/python" -e .
export PYTHONPATH="$PWD/src:$PWD/packages/protocol/src:$PWD"

POLICY_DEPLOY=policies/openpi/pi05_artixon_arm_6a_joint/deploy.yaml
"$OPENPI_ROOT/.venv/bin/python" -m policy_space.cli check "$POLICY_DEPLOY"
"$OPENPI_ROOT/.venv/bin/python" -m policy_space.cli serve "$POLICY_DEPLOY" \
  --host 0.0.0.0 --port 8001
Once the check passes and the Model Server is running, register its endpoint as described in “Register the service and submit a cloud evaluation”, select ArtiXon Arm-6A and submit the evaluation. For an optional local test, set action_mode: joint_position and action_type: absolute_joint, and use the matching action frequency.
Reference baseline: 12 October 2026 — Policy Space e08bb54e (package 0.3.0, protocol v2) and X2Real b77a438b. For other models, follow the relevant adapter documentation and the contracts supported by the platform.